Media File Settings
Before publishing a media file, you need to configure its basic parameters: name, description, poster, tags, privacy, and other settings. These parameters affect the video’s visibility in search engines, ease of search in the catalog, and content accessibility for viewers.
Who this article is for
- Content managers — need to configure video metadata for SEO and easy search
- Project administrators — need to configure privacy and video access
- Marketers — need to optimize video for search engines and social media
- Course creators — need to configure access to learning materials
Basic parameters
The “General” tab includes the following parameters:
- Name and description. By default, the name is taken from the original file. You can change it and add a description to help with SEO.
- Poster, or video thumbnail. This can be an uploaded image or a selected frame.
- Tags — keywords for easier search and filtering.
- Privacy settings. Control access to the video and the ability to embed it on external sites.
- Player selection. By default, the standard Kinescope player is used, but you can fully customize it.
- File versions. Track and manage video replacements without re-embedding video or changing links.
- Sharing access to files.

Name, subtitle, and description
Name
The name should be concise but informative. It helps viewers understand the video’s content and affects visibility in search engines.
- The “Name” field cannot be empty. If left empty, Kinescope will keep the original file name.
- The name must not exceed 140 characters.
Subtitle and description
The subtitle complements the name and clarifies the video topic, while the description helps viewers and search engines understand what the video is about.
- The subtitle is limited to 140 characters.
- Use keywords in the description to improve SEO.
Click “Save” to finish editing.
Auto-generate description (beta)
This feature automatically generates a description based on the video content. It is currently in open beta testing. To participate, write to the support chat within the Kinescope interface.
Selecting a poster
The poster is a key visual element of the media file. It appears everywhere the video is published: in search results, on video pages, and in link previews.
By default, Kinescope automatically selects a poster. For videos longer than 30 seconds, the system picks a frame from the first scene change after the 30-second mark. If no such frame is found, the 25th frame is used. However, this choice doesn’t always reflect the video’s essence, so you can upload your own poster or select a suitable frame from the video. To do this, open the “Add poster” dropdown and select “Upload poster” or “Select frame”.
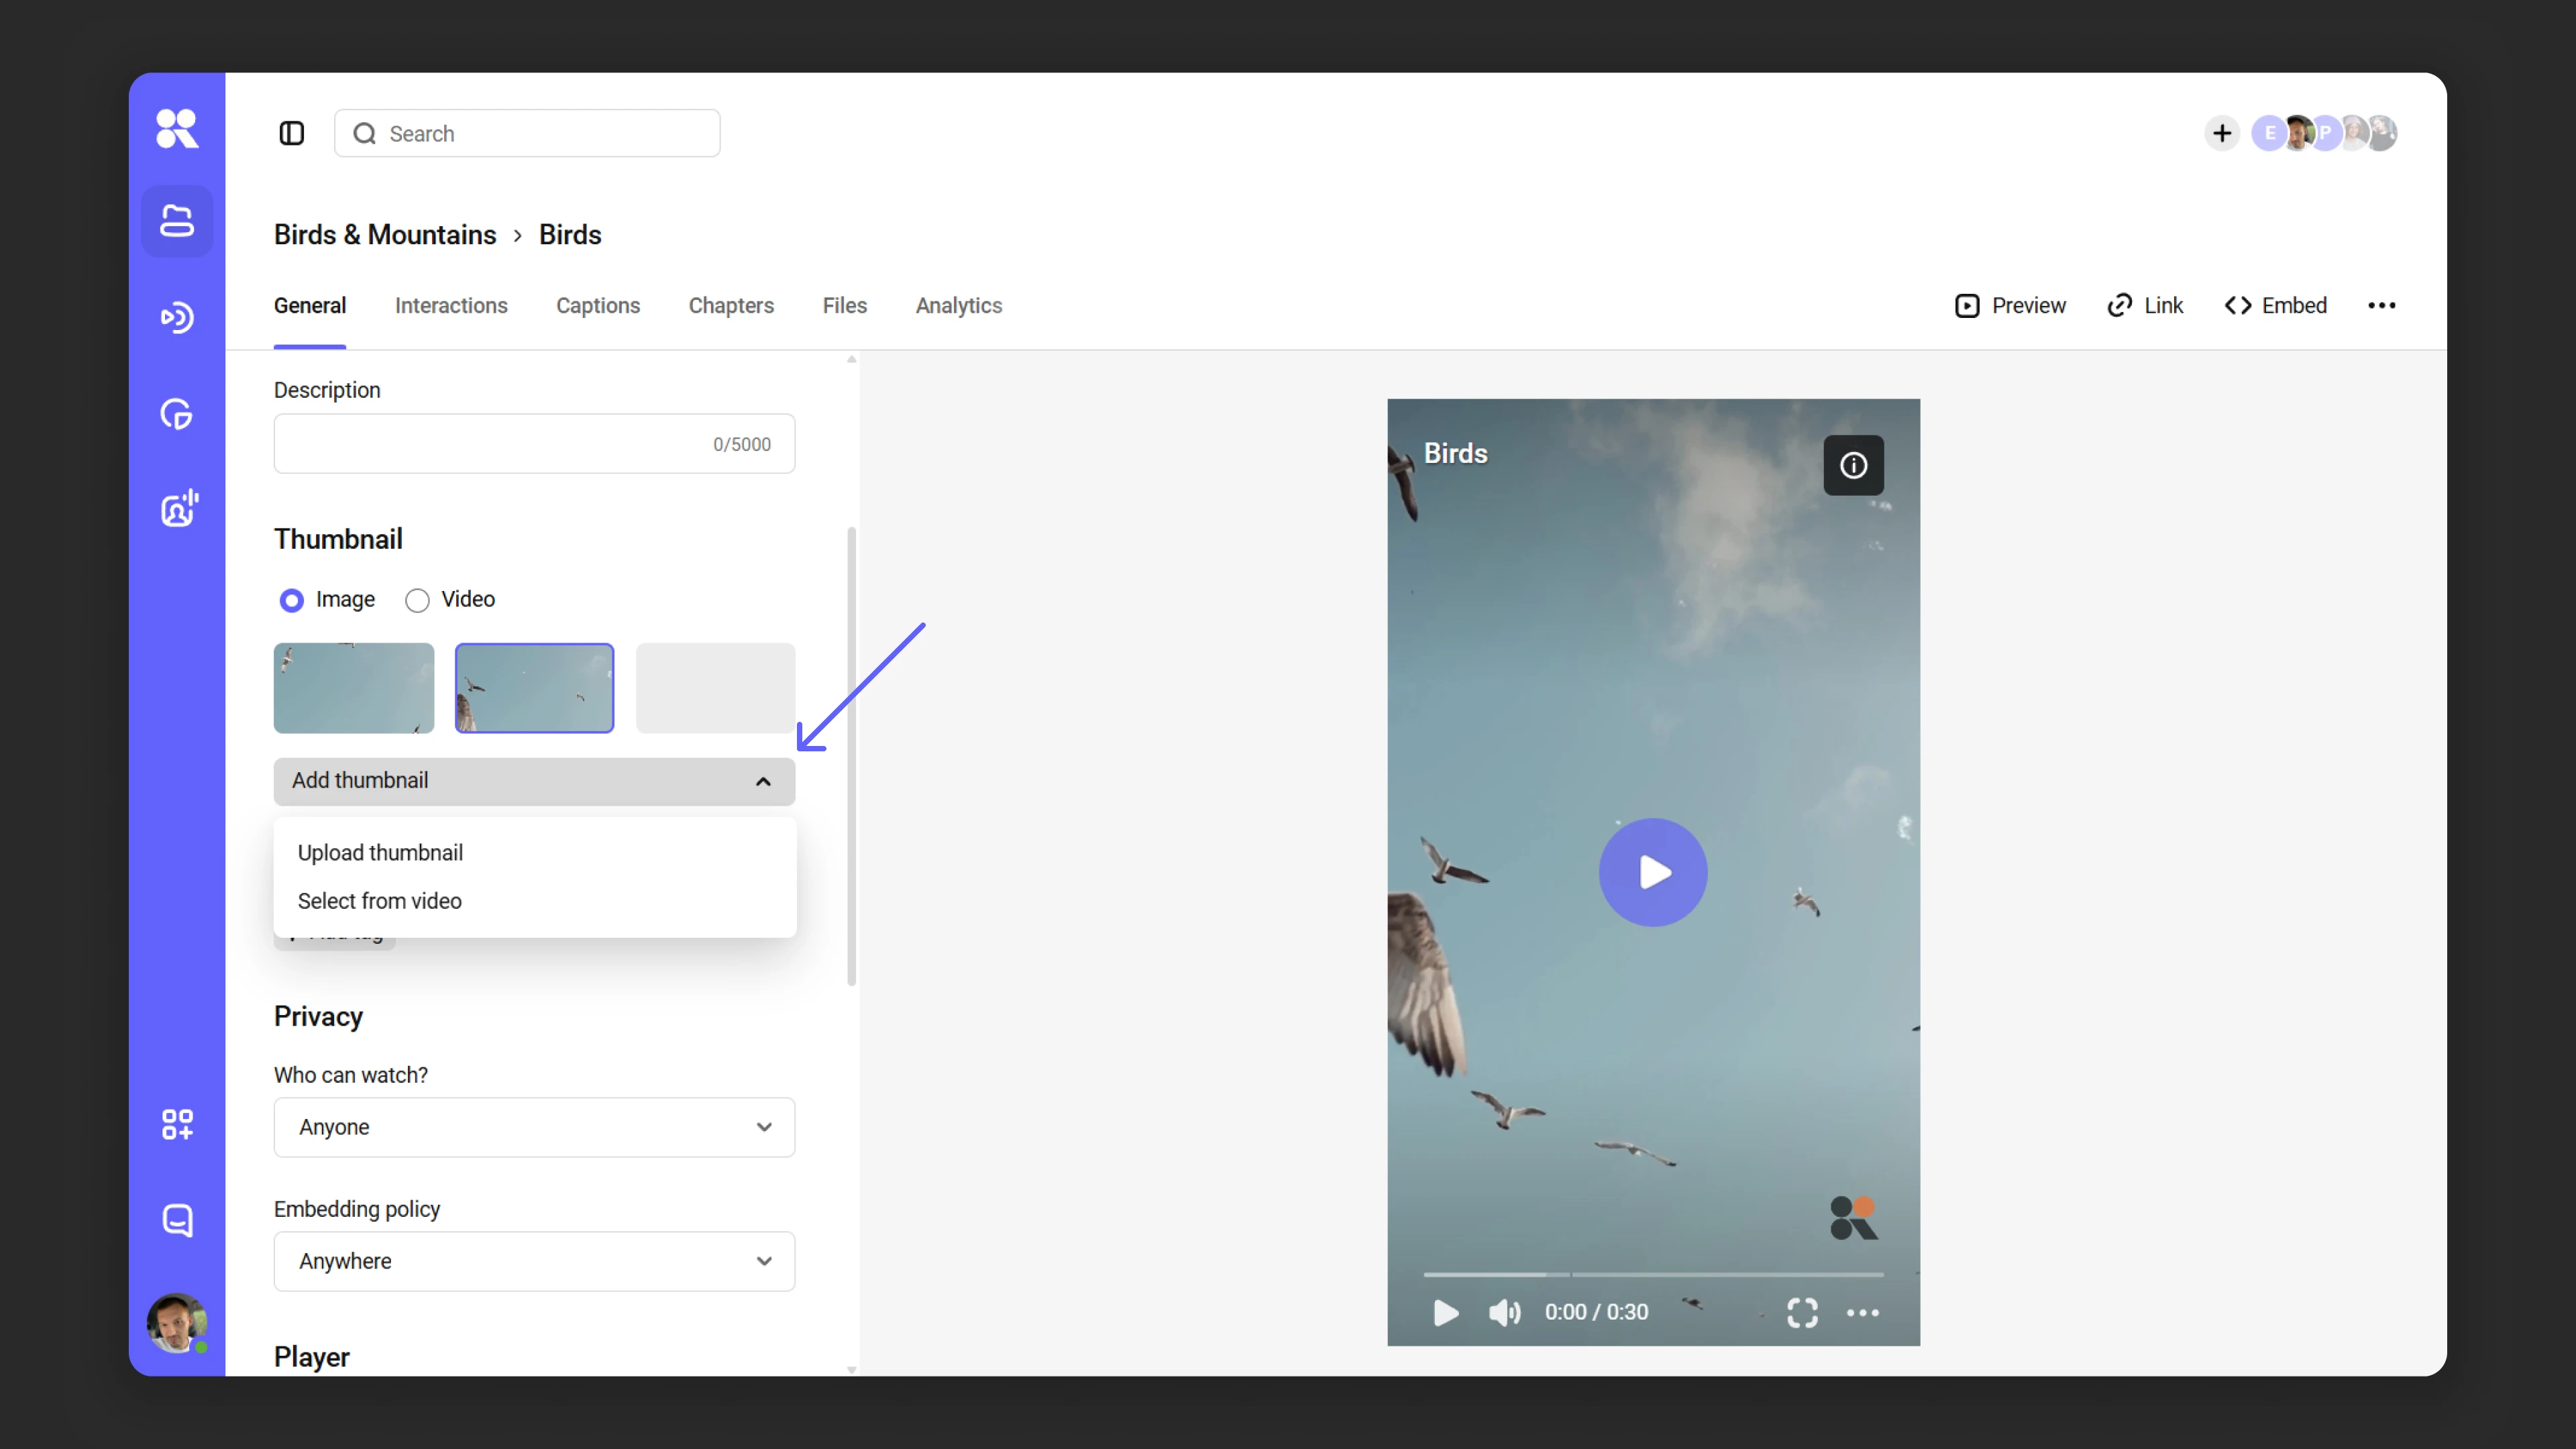
Uploading a poster
If you want to upload a custom poster image:
- Click “Add poster” → “Upload poster”.
- In the window that opens, upload an image from your computer.
- Click “Save”.
To make the poster look good, make sure the poster’s aspect ratio matches the video’s — you can find the video’s aspect ratio in the “Files” tab.
Selecting a frame from the video
You can also select a frame from the video itself to use as a poster:
- Click “Add poster” → “Select frame”.
- A player with frame selection opens.
- Play the video to the desired moment and pause it.
- Click the “Frame” field. Use the up and down arrow keys to navigate between frames to find the right one.
- Click “Save poster” to confirm your selection.
- Click “Save”.
Downloading video posters from Kinescope via direct links
You can download posters from Kinescope videos via direct links. Posters are available in different formats (JPG and WEBP) and different sizes.
Downloading a poster in standard size
If you need a poster in standard (default) size, use the following link format: JPG: https://kinescope.io/<video_link>/poster.jpg
WEBP: https://kinescope.io/<video_link>/poster.webp
Simply open the desired link in a browser or use right-click → “Save image as…”.
Downloading a poster in a specific size
If you need a poster in a specific size, replace {size} in the URL with one of these values:
- xs – extra small poster
- sm – small poster
- md – medium poster
- lg – large poster
Examples:
Small poster (sm) in JPG format:
https://kinescope.io/<video_link>/poster/sm.jpgMedium poster (md) in WEBP format:
https://kinescope.io/<video_link>/poster/md.webp
Tags
What are tags?
Tags help structure media files and improve their search visibility. For example, a video about growing oranges might have the tags “oranges”, “trees”, “gardening”.
Adding tags
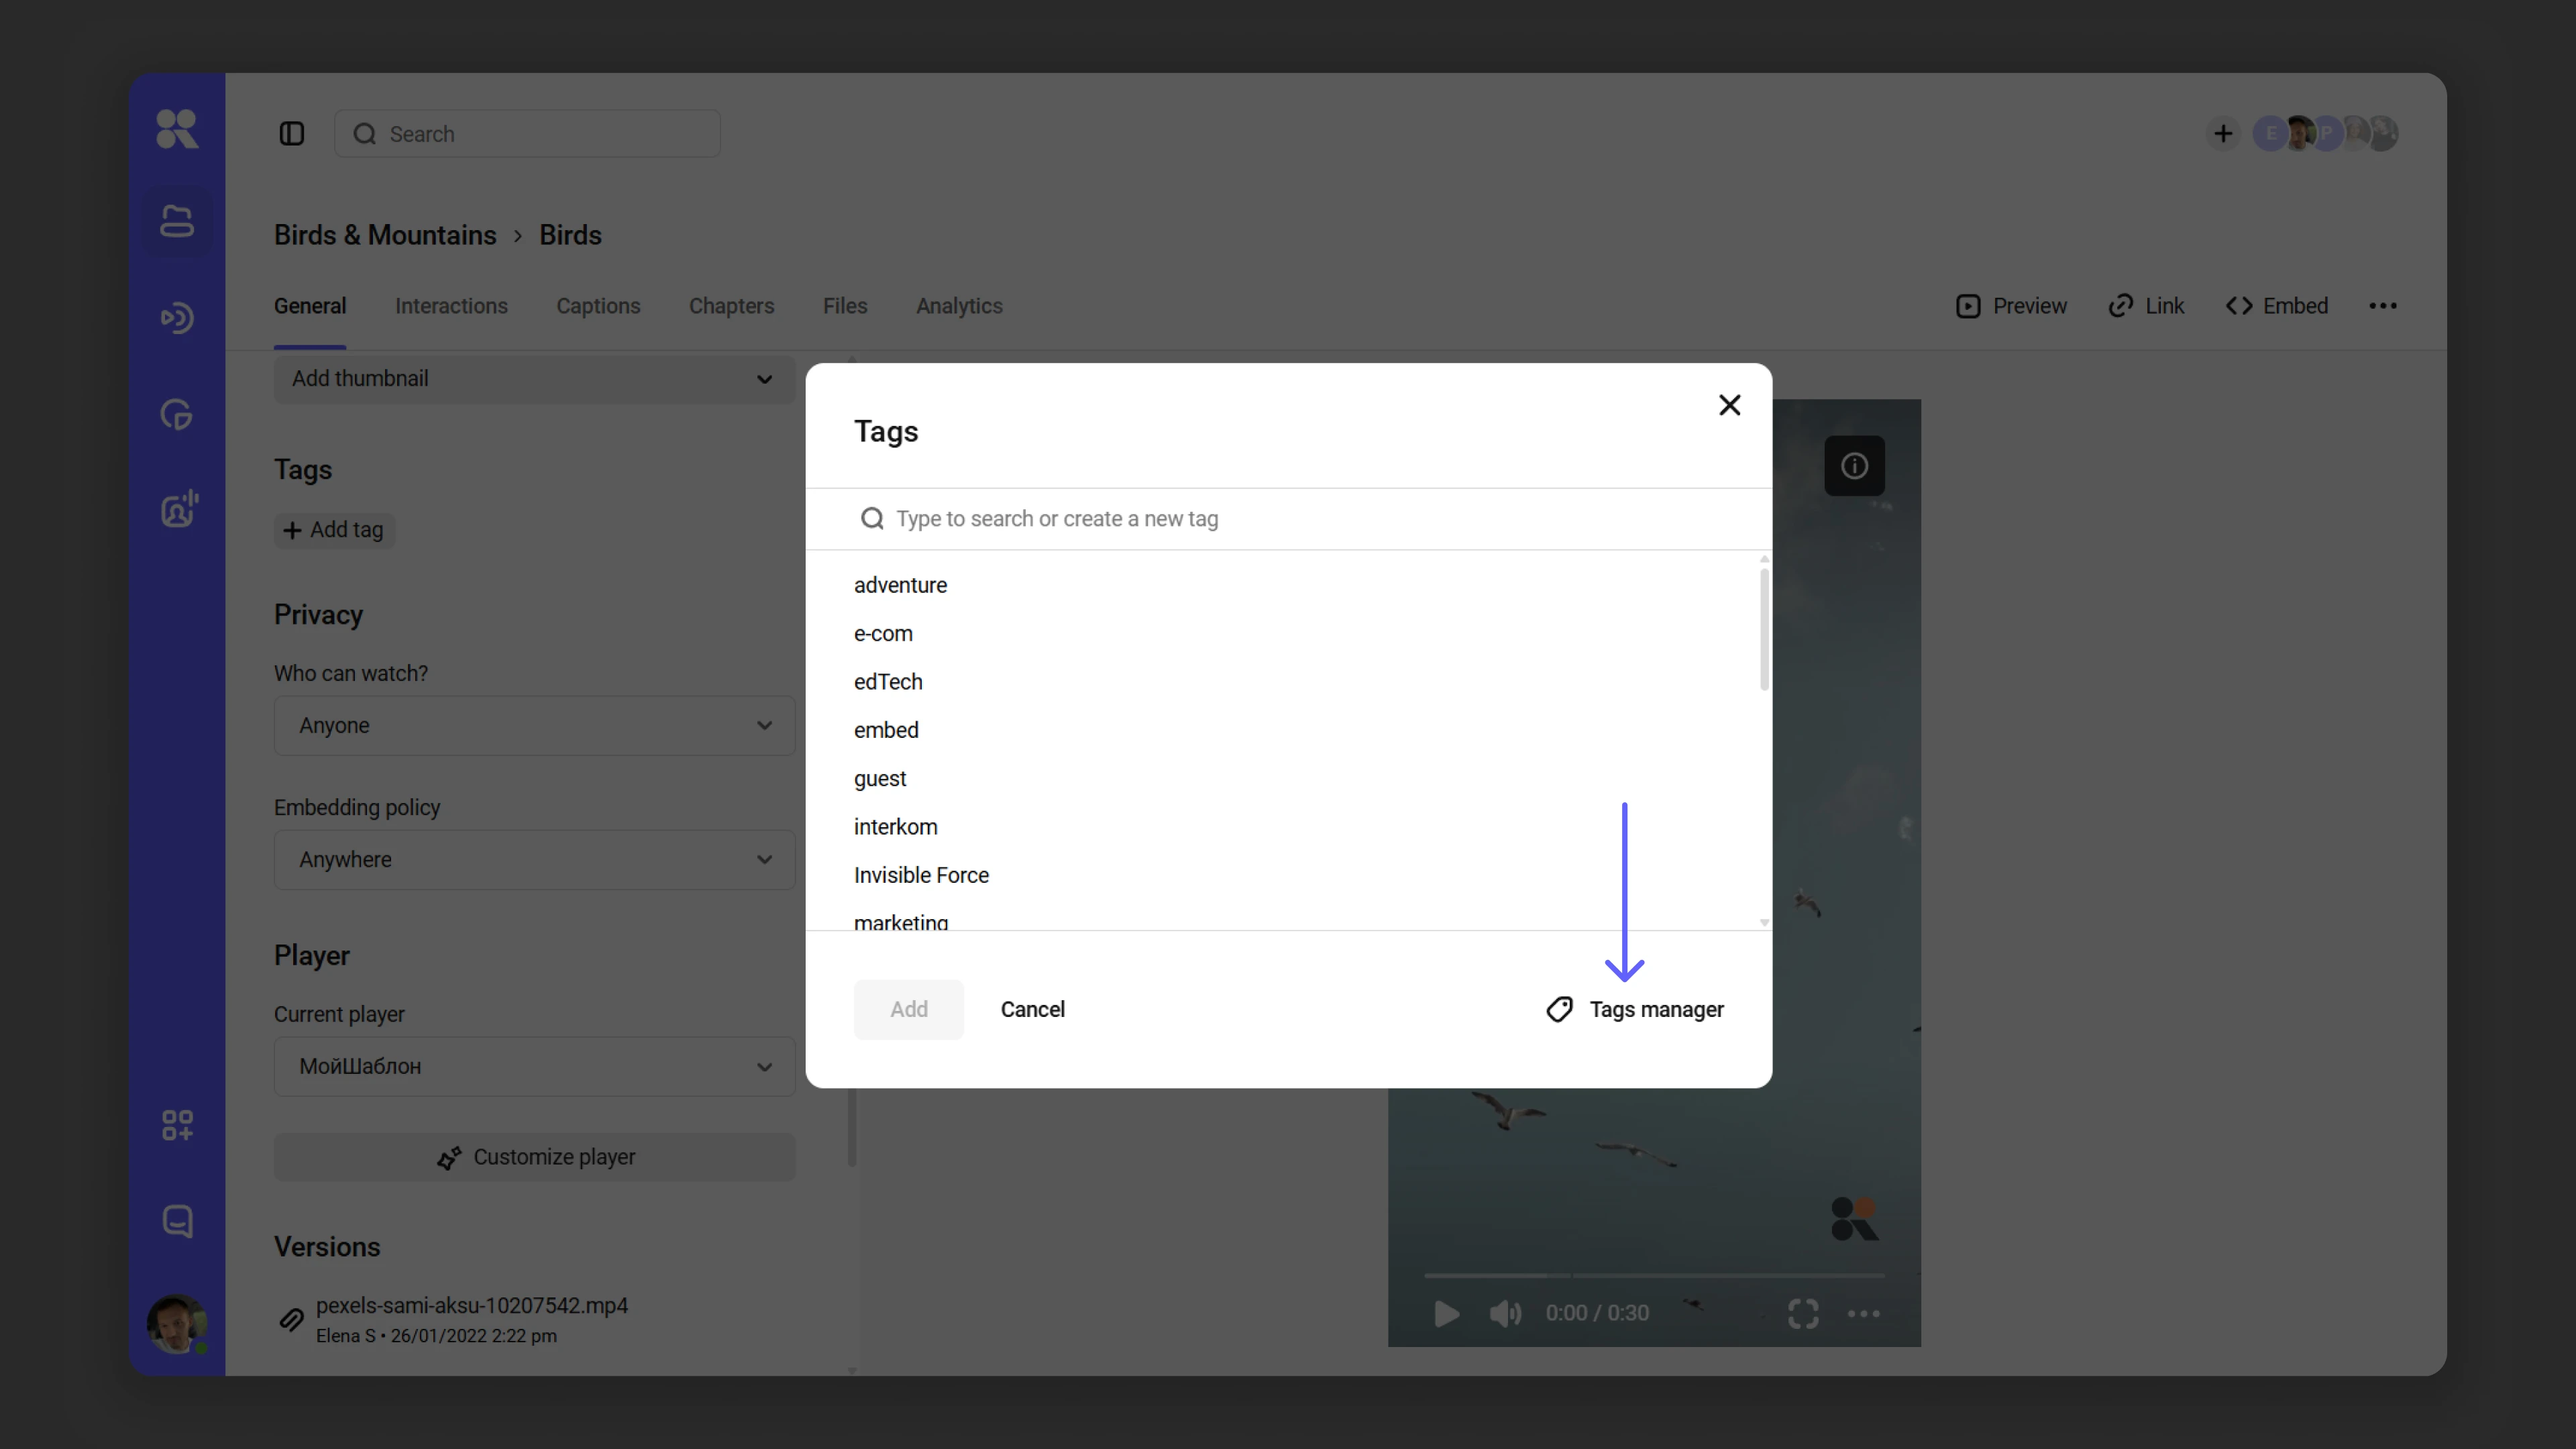
- In the media file settings, find the “Tags” field and click “Add tag”.
- In the dialog that appears, enter tags one by one, pressing Enter after each one. You can also click “Create new tag” to add it to the collection.
- If a tag you enter already exists, it will be suggested in a list. Click the relevant option to add it.
- When your tag list is complete, click “Add” to save them.
- Click “Save” to confirm. To remove a tag, click the “×” next to it.
Managing tags via the tag manager
The tag manager in Kinescope lets you view, add, edit, or delete tags. To access it:
- Open the “Tags” dialog in the media file settings → “Tag manager”.
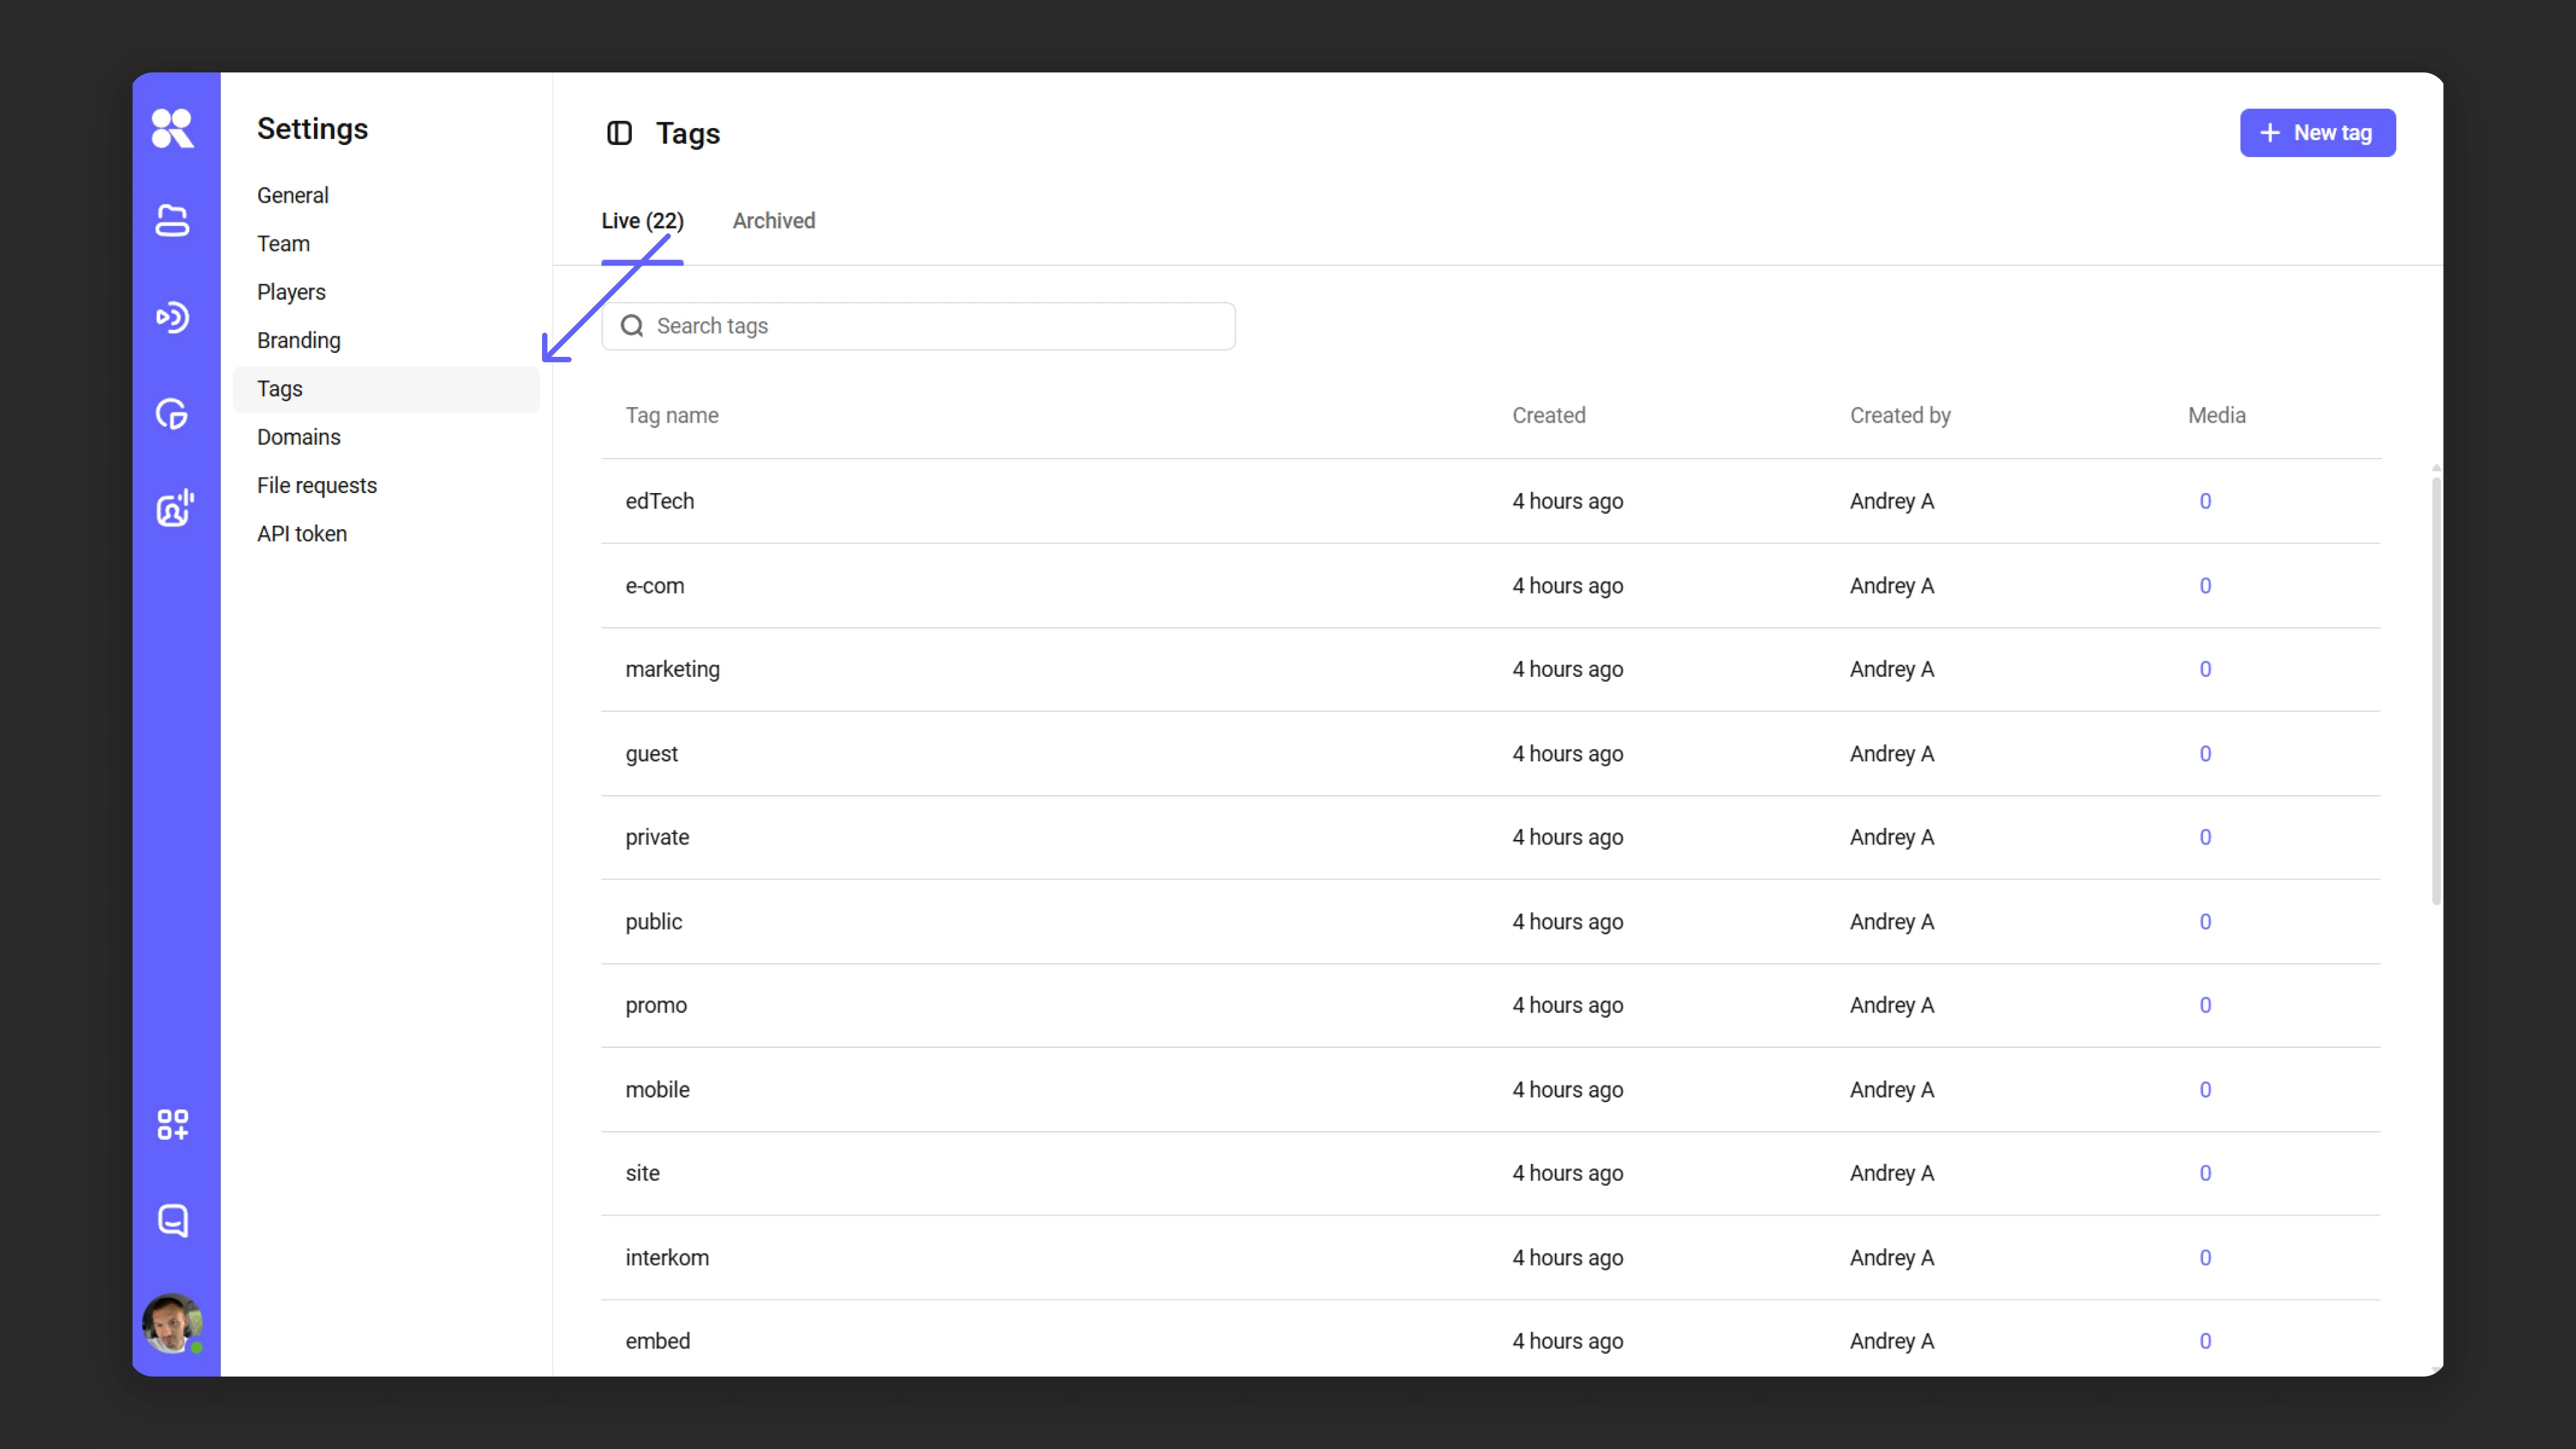
- Or hover over your avatar → “Settings” → “Tags”.
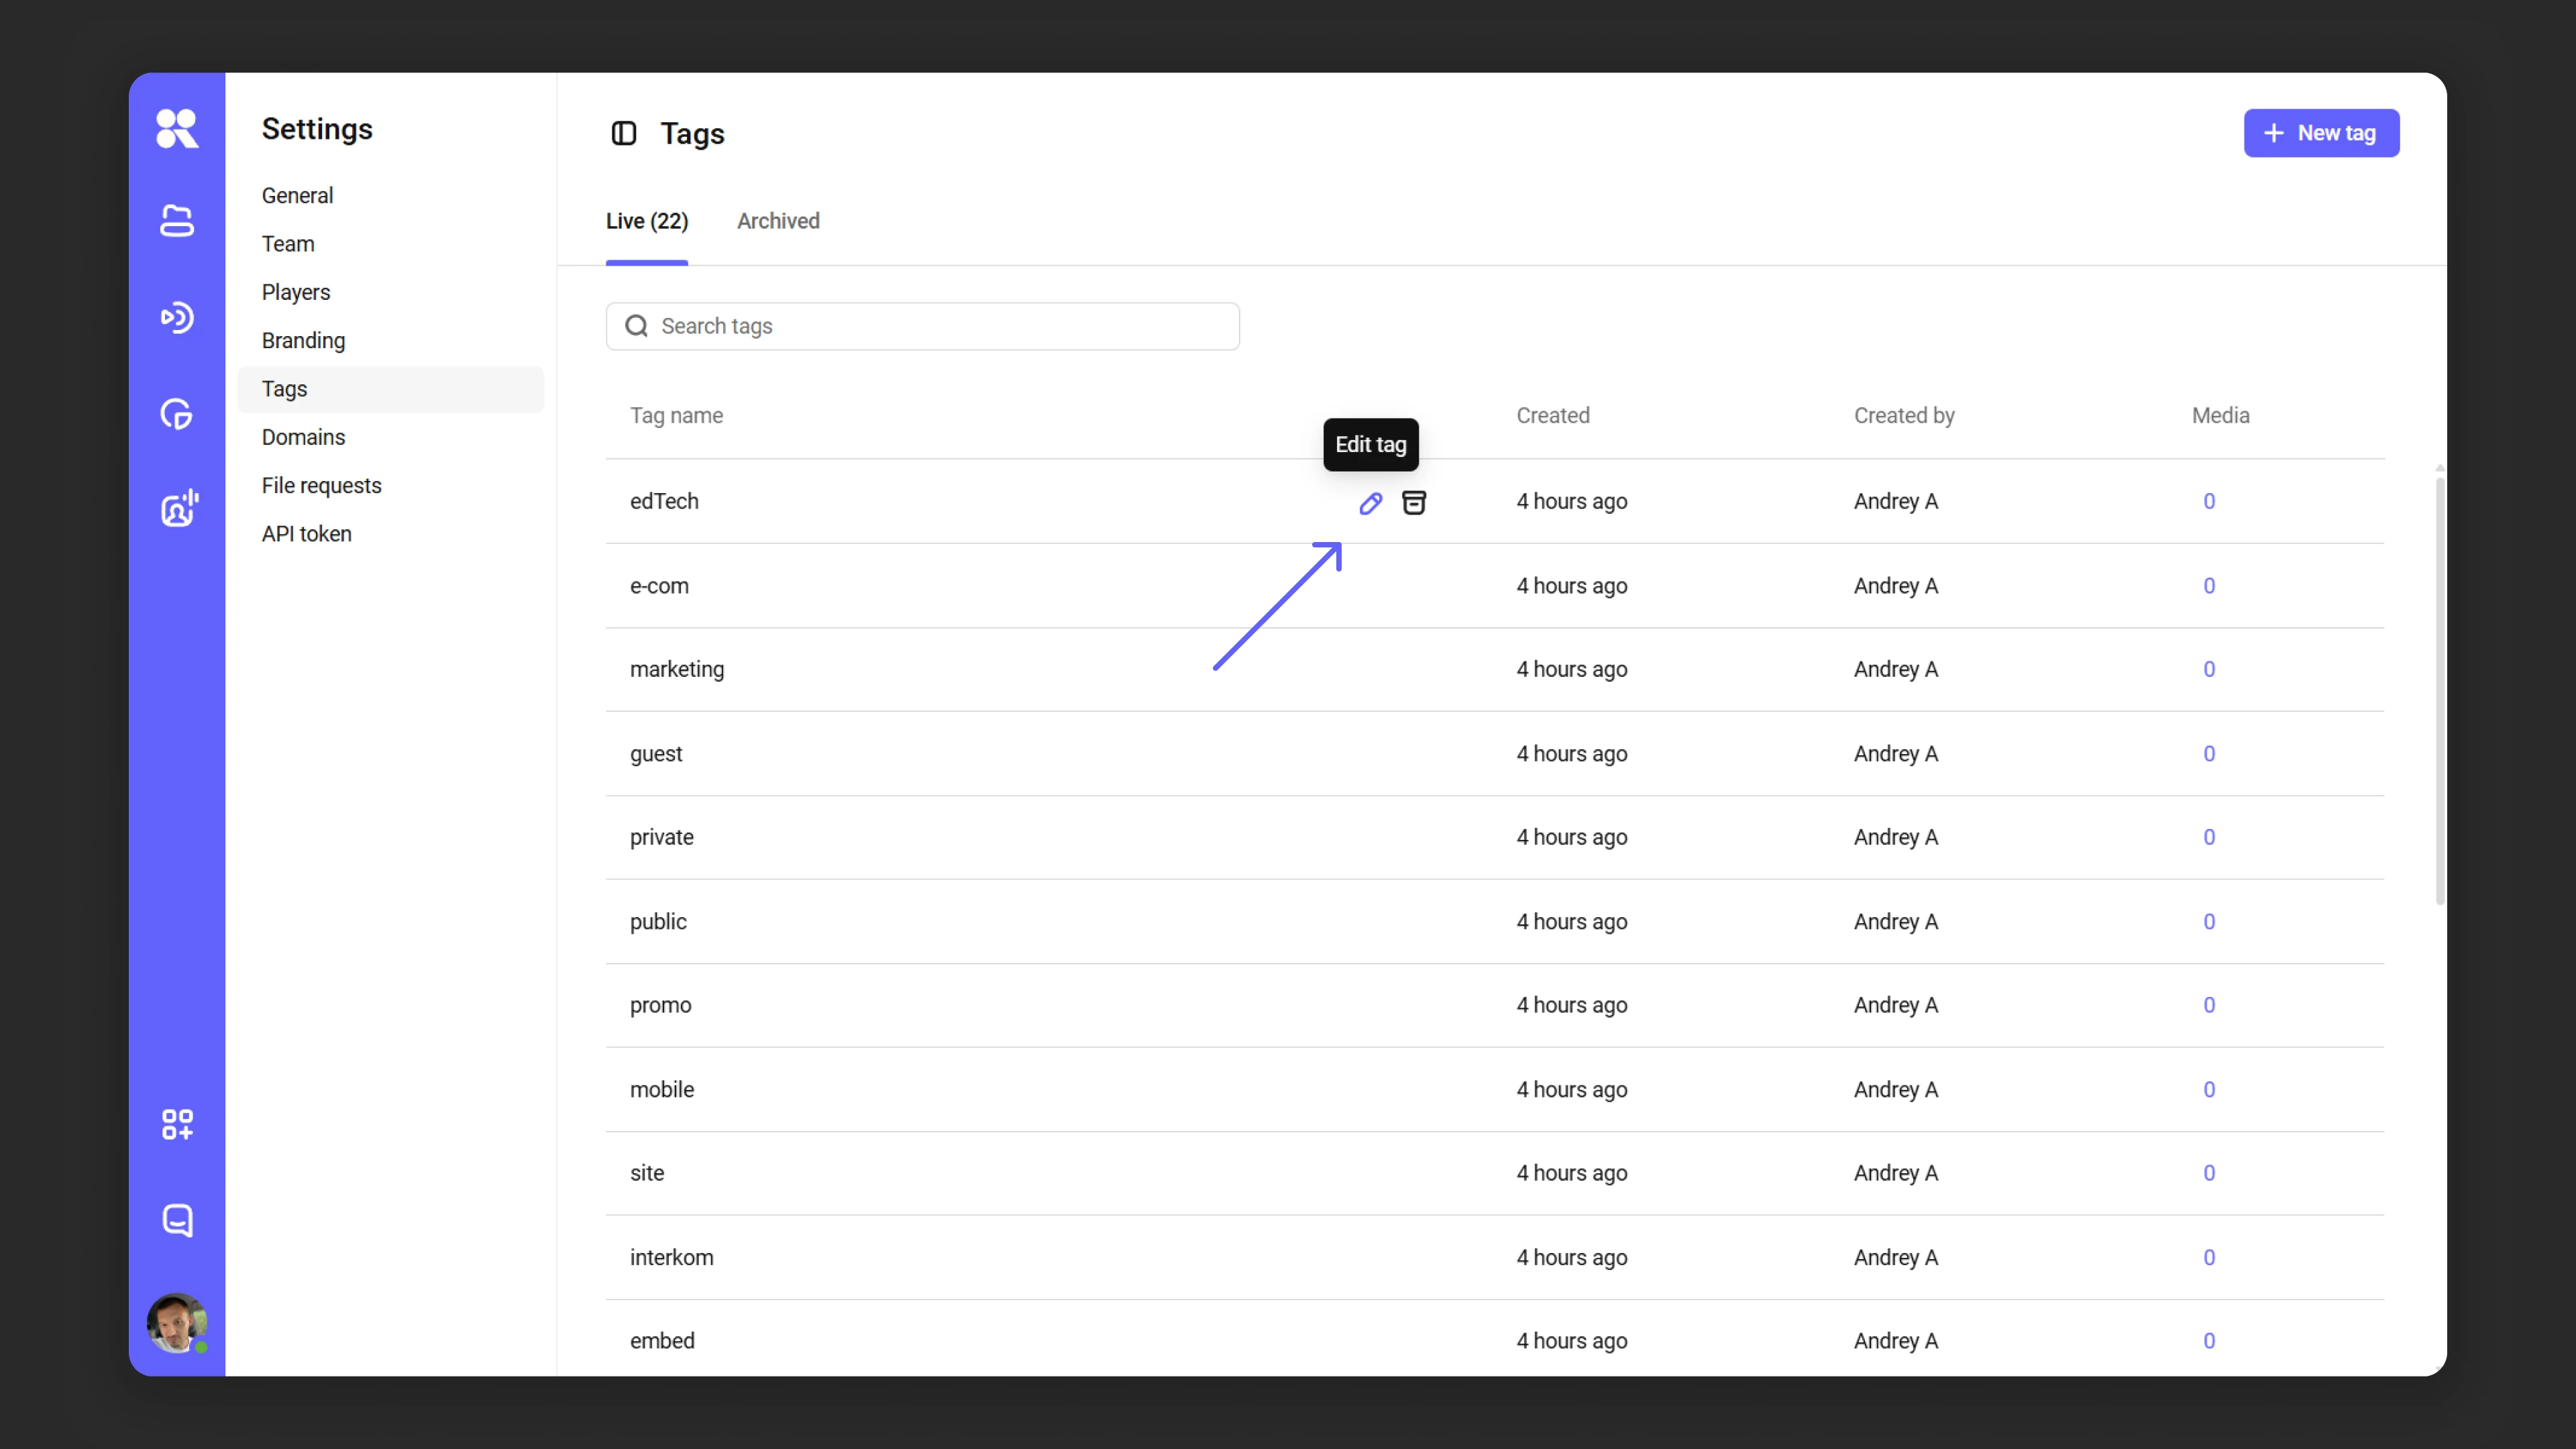
Adding a new tag
- Click “New tag”.
- Enter the tag name and click “Add”.
Editing tags
To modify an existing tag:
- Click the “Edit tag” icon next to it.
- Make changes and confirm.
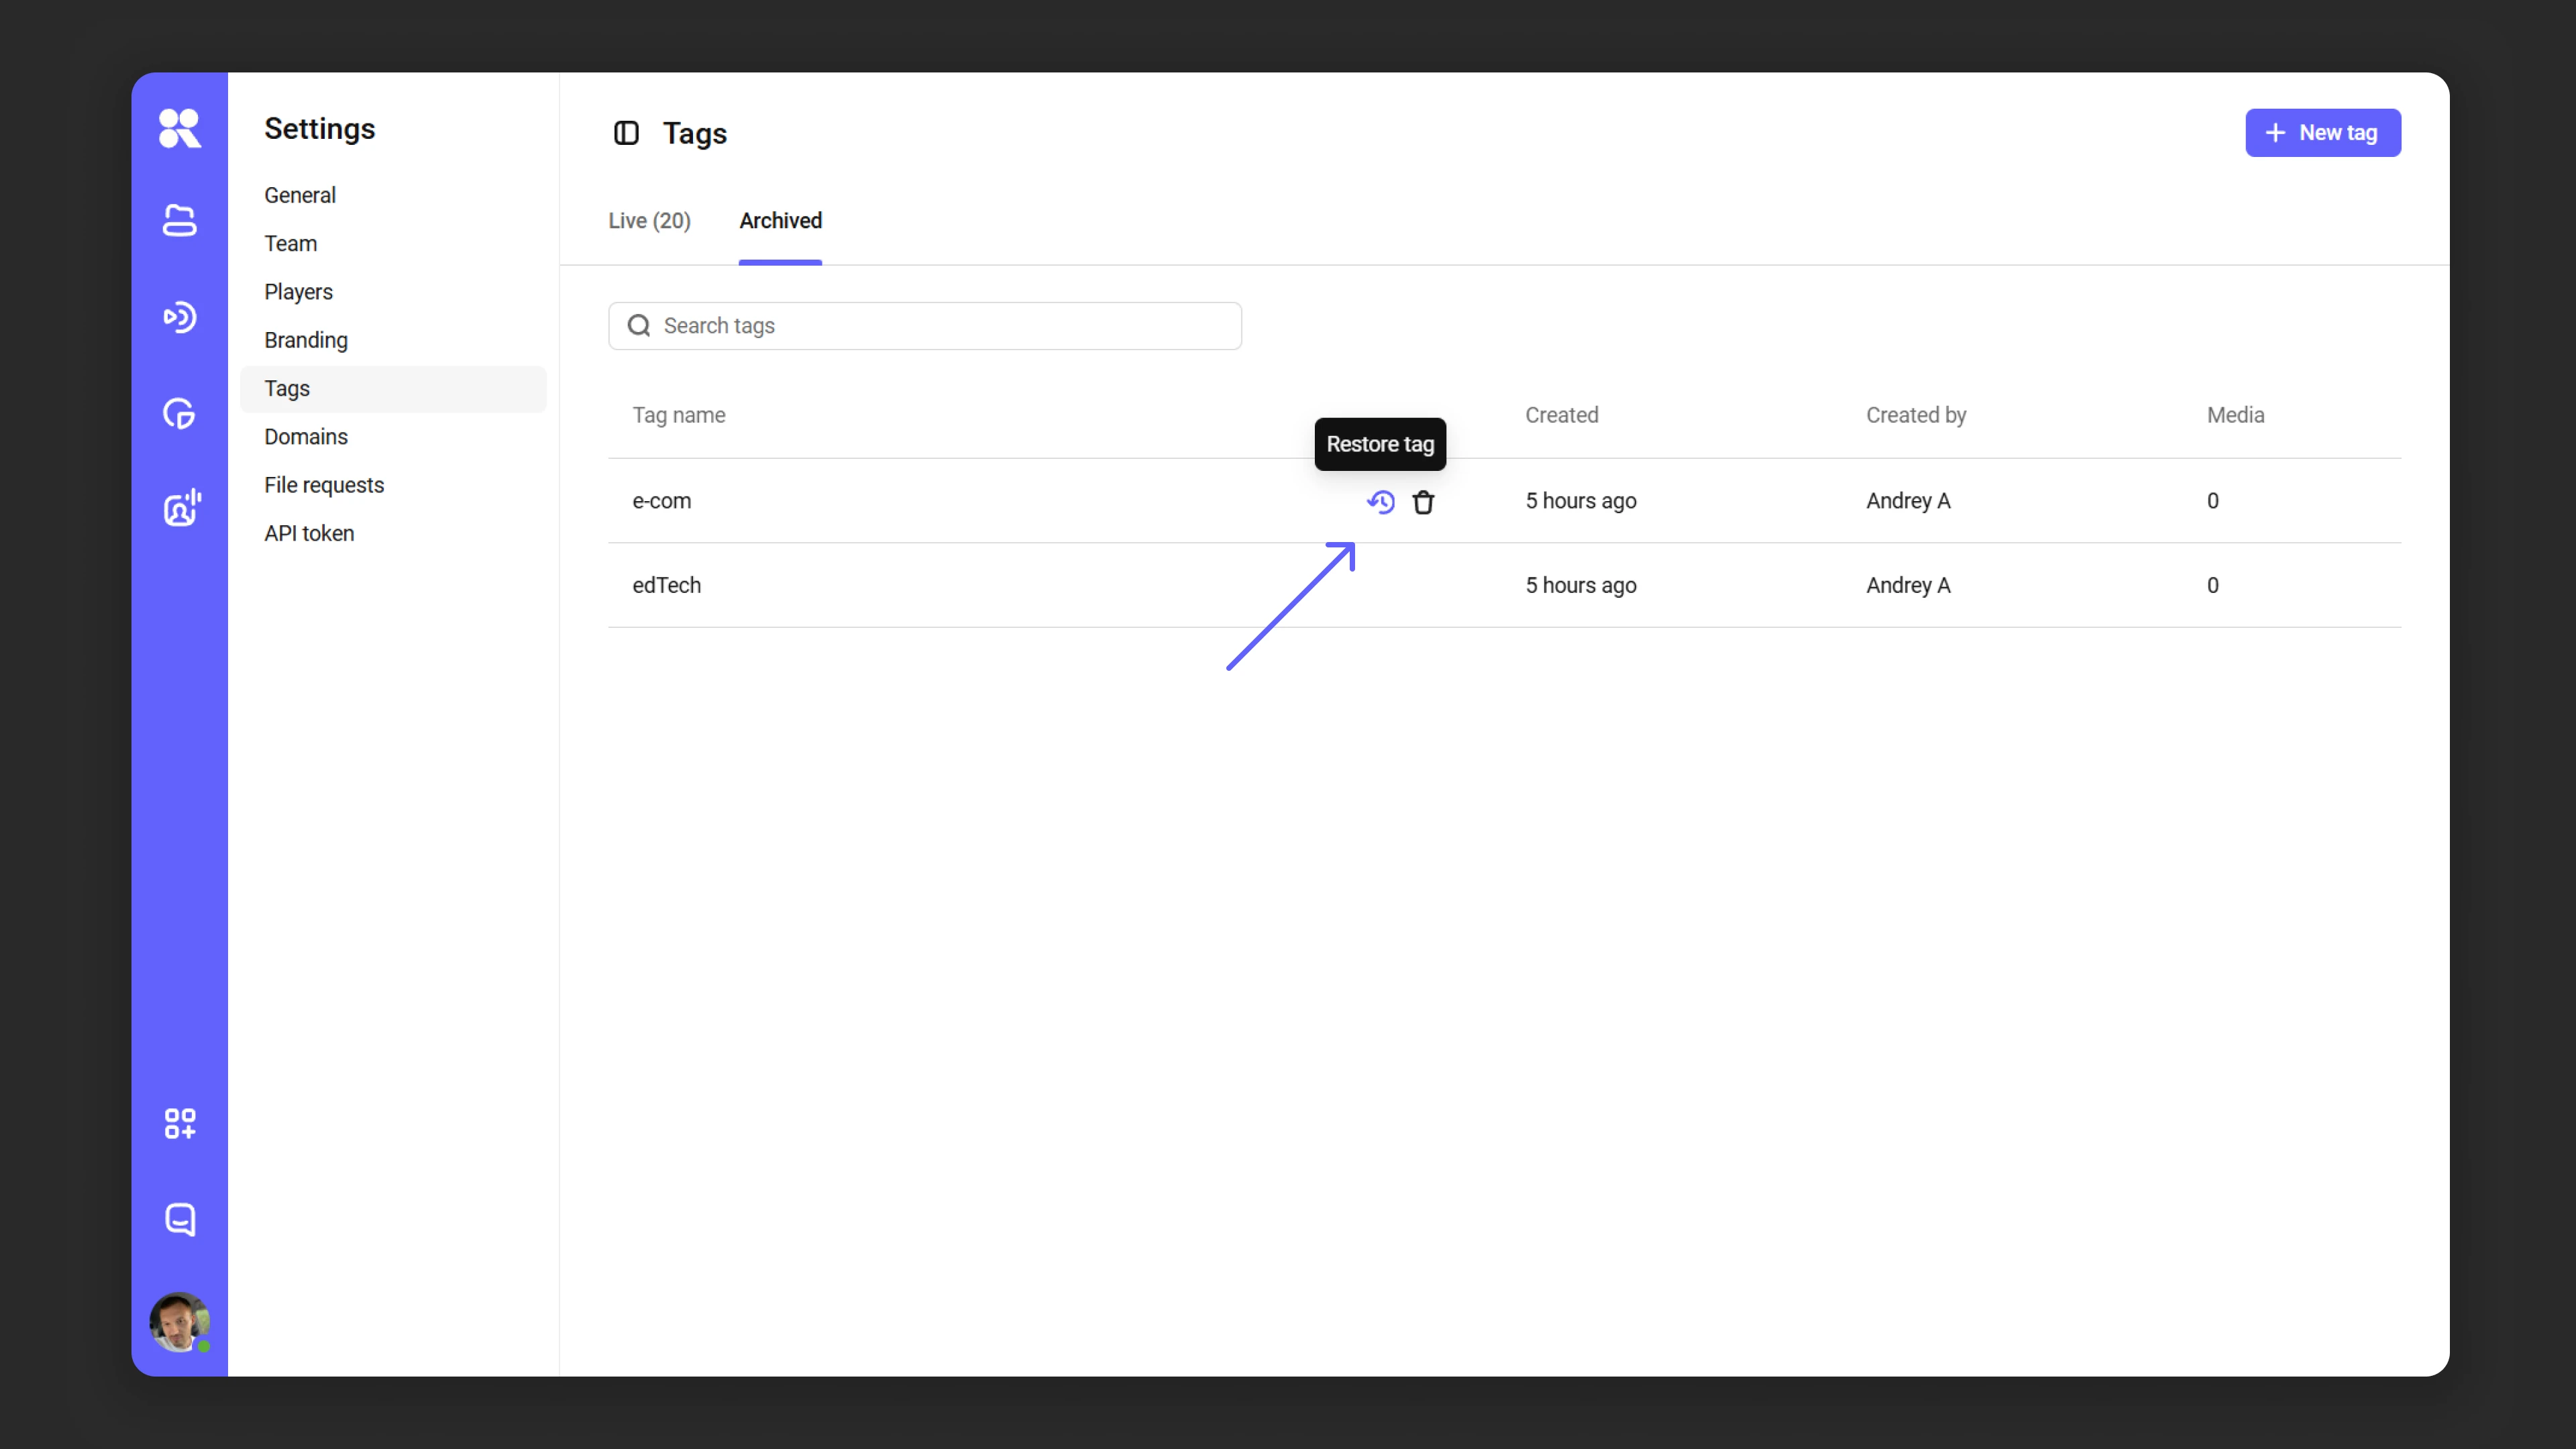
Archiving and deleting tags
Unused tags can be archived or deleted:
- Click the “Archive tag” icon.
- Choose the action: send the tag to the archive or delete it permanently.

Archived tags can be restored via the “Archive” tab → “Restore tag”.
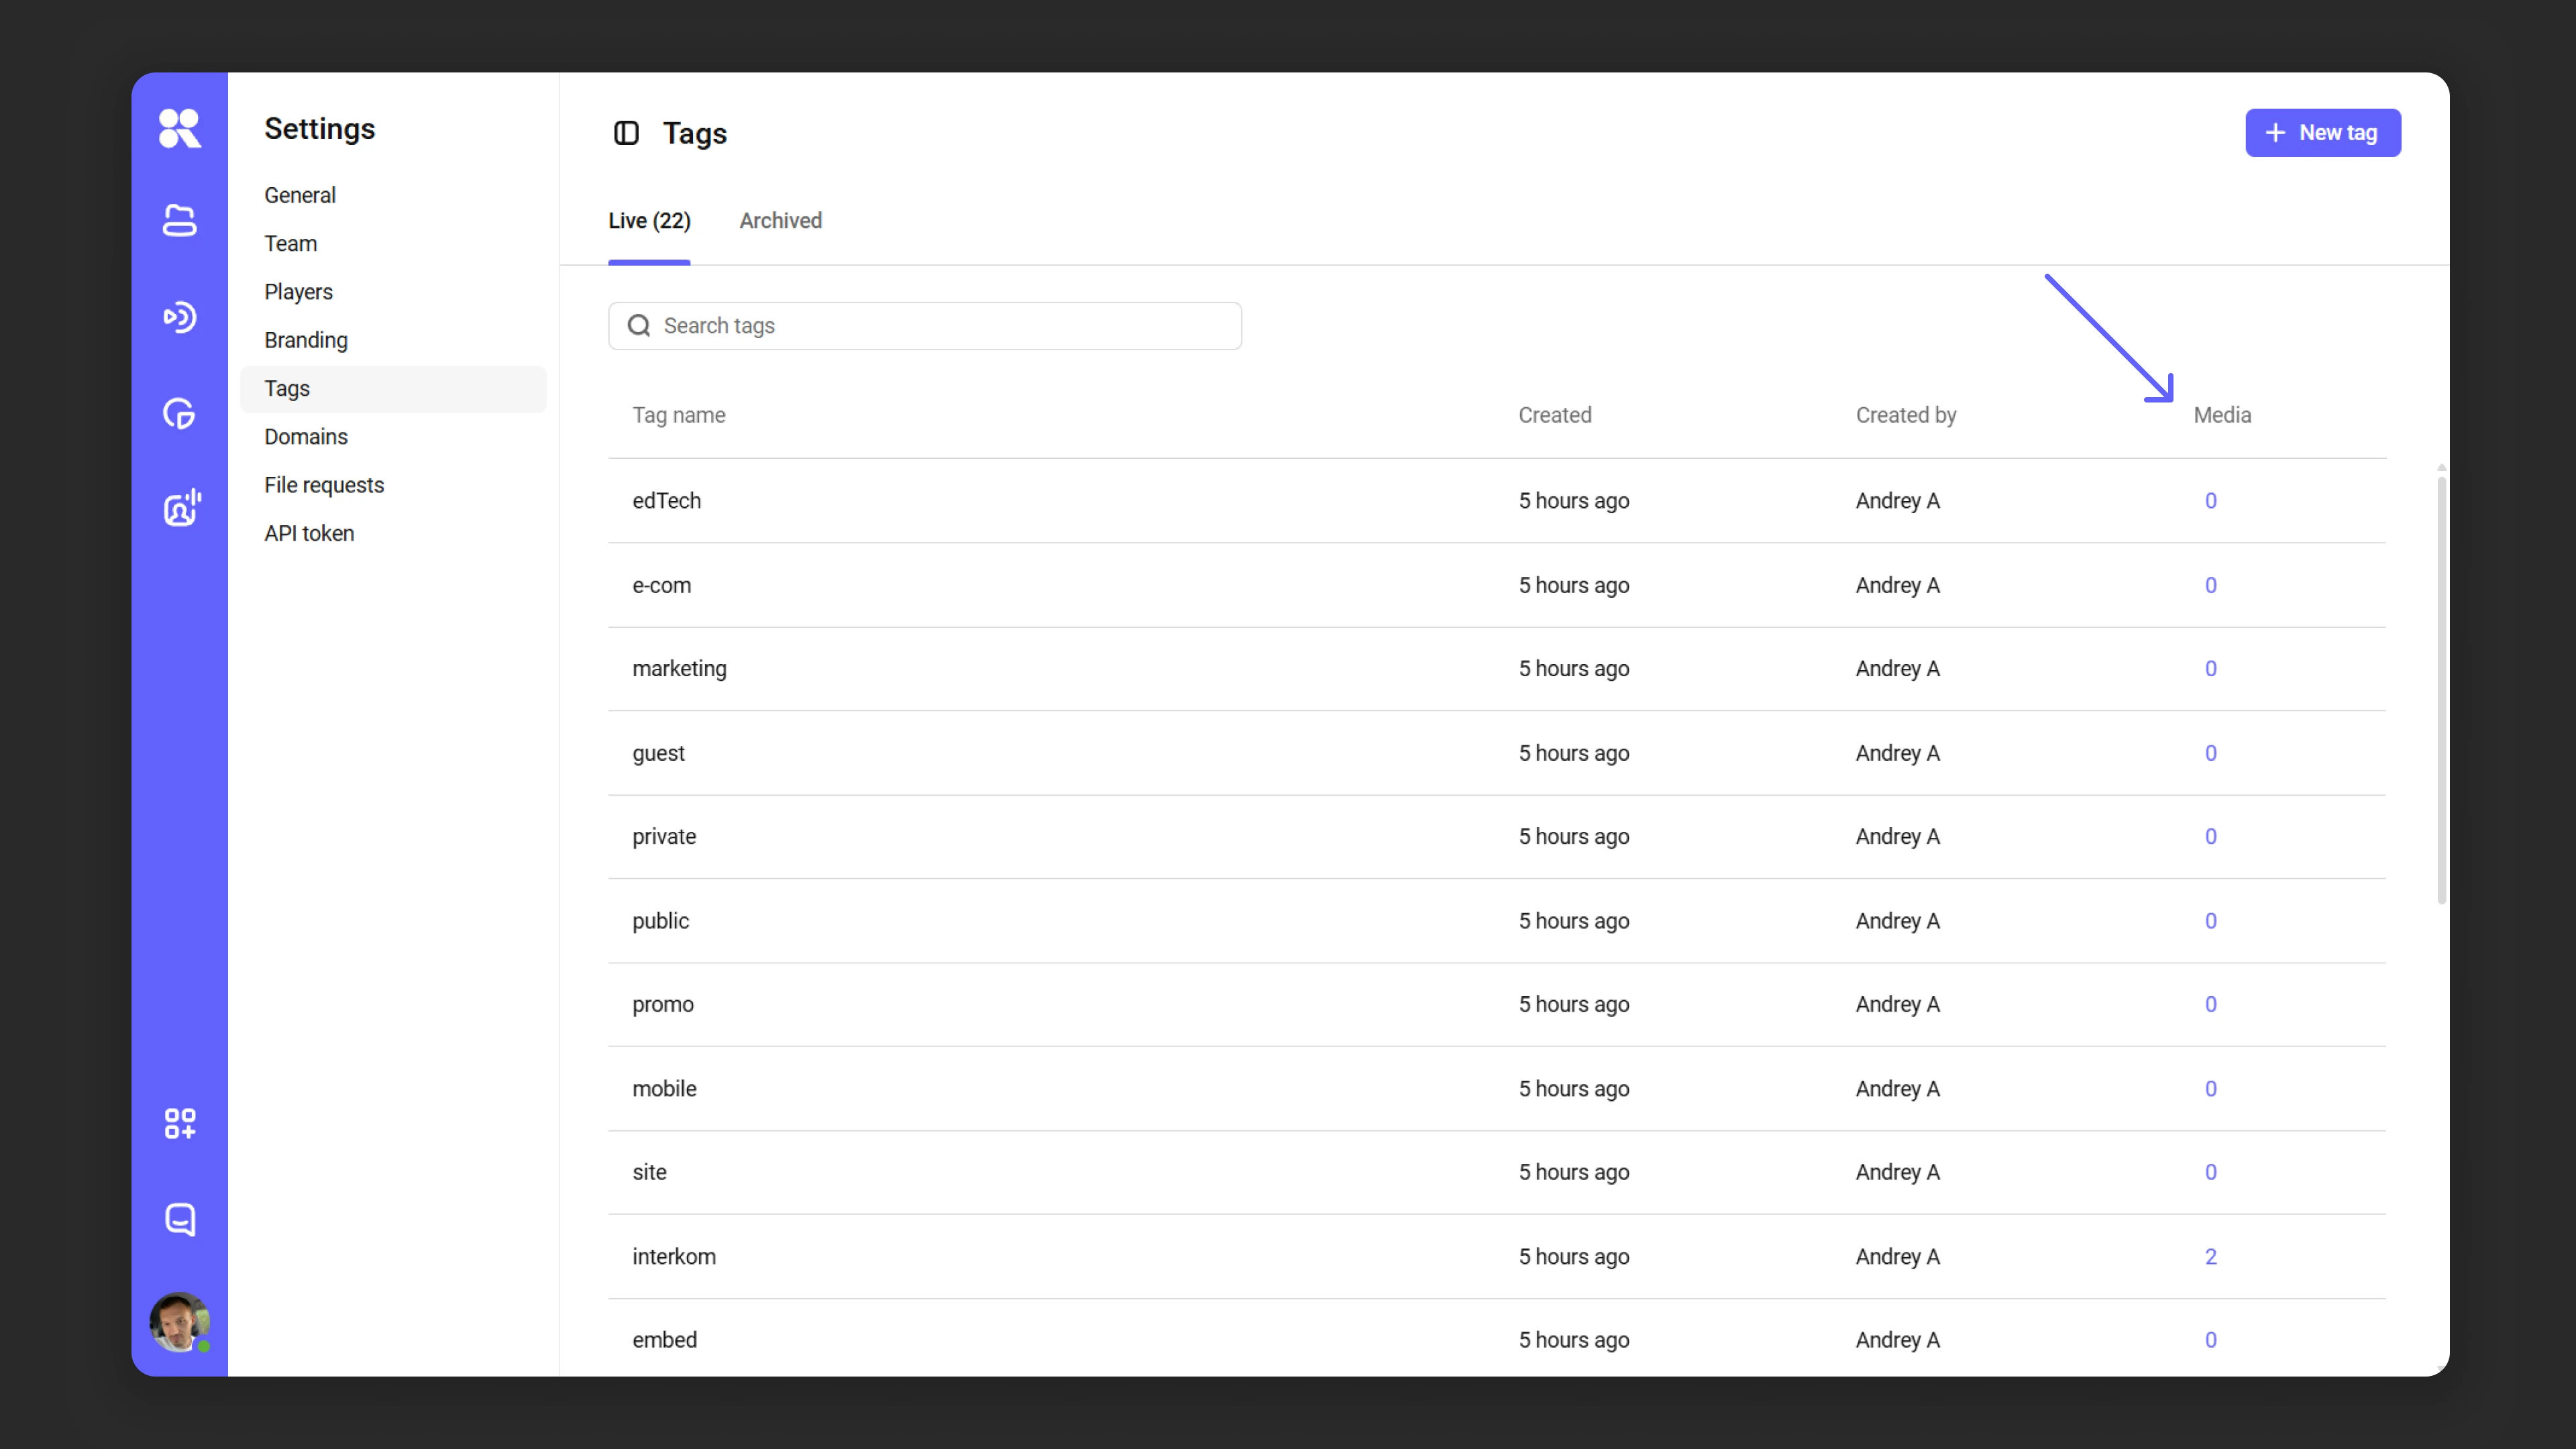
Viewing media files linked to a tag
To see media files linked to a specific tag:
- Click the number in the “Media” column next to the tag.
- A list of all files linked to that tag will open.
Managing media file privacy settings
Privacy settings overview
Privacy settings in Kinescope let you precisely control who can view your media files and where. You can control access to your files and regulate their embedding, as described below.
Managing view access
To configure access settings, open the “Who can view?” field in the privacy settings and choose one of five levels:
- Everyone — access is open to all users regardless of how they’re viewing.
- Users with a private link — access only via a unique link that is created automatically.
- Users with a password — viewing requires entering a password you set.
- Users with unique codes — viewing only for people you give a code to; useful for paid webinars and private screenings without registration.
- Users by work email (e-mail domain) — viewing is available for users from an allowed email domain.

Private link
- Select the access level “Users with a private link”.
- Click “Save”.
- If needed, refresh the link using the refresh icon.
Password access
- In settings, select “Users with a password”.
- Set a password and confirm changes with the “Save” button.
Access by unique codes
Unique codes limit viewing to people you give a code to — handy for webinars and private screenings without sign-up. Under “Privacy”, in “Who can view?”, select “Users with unique codes”, then “Manage codes”: generate a batch, download the file, and share the video link and codes with viewers.
For a full walkthrough with screenshots, what viewers see, deleting batches, and FAQs, see Video access restrictions (section Access by unique codes).
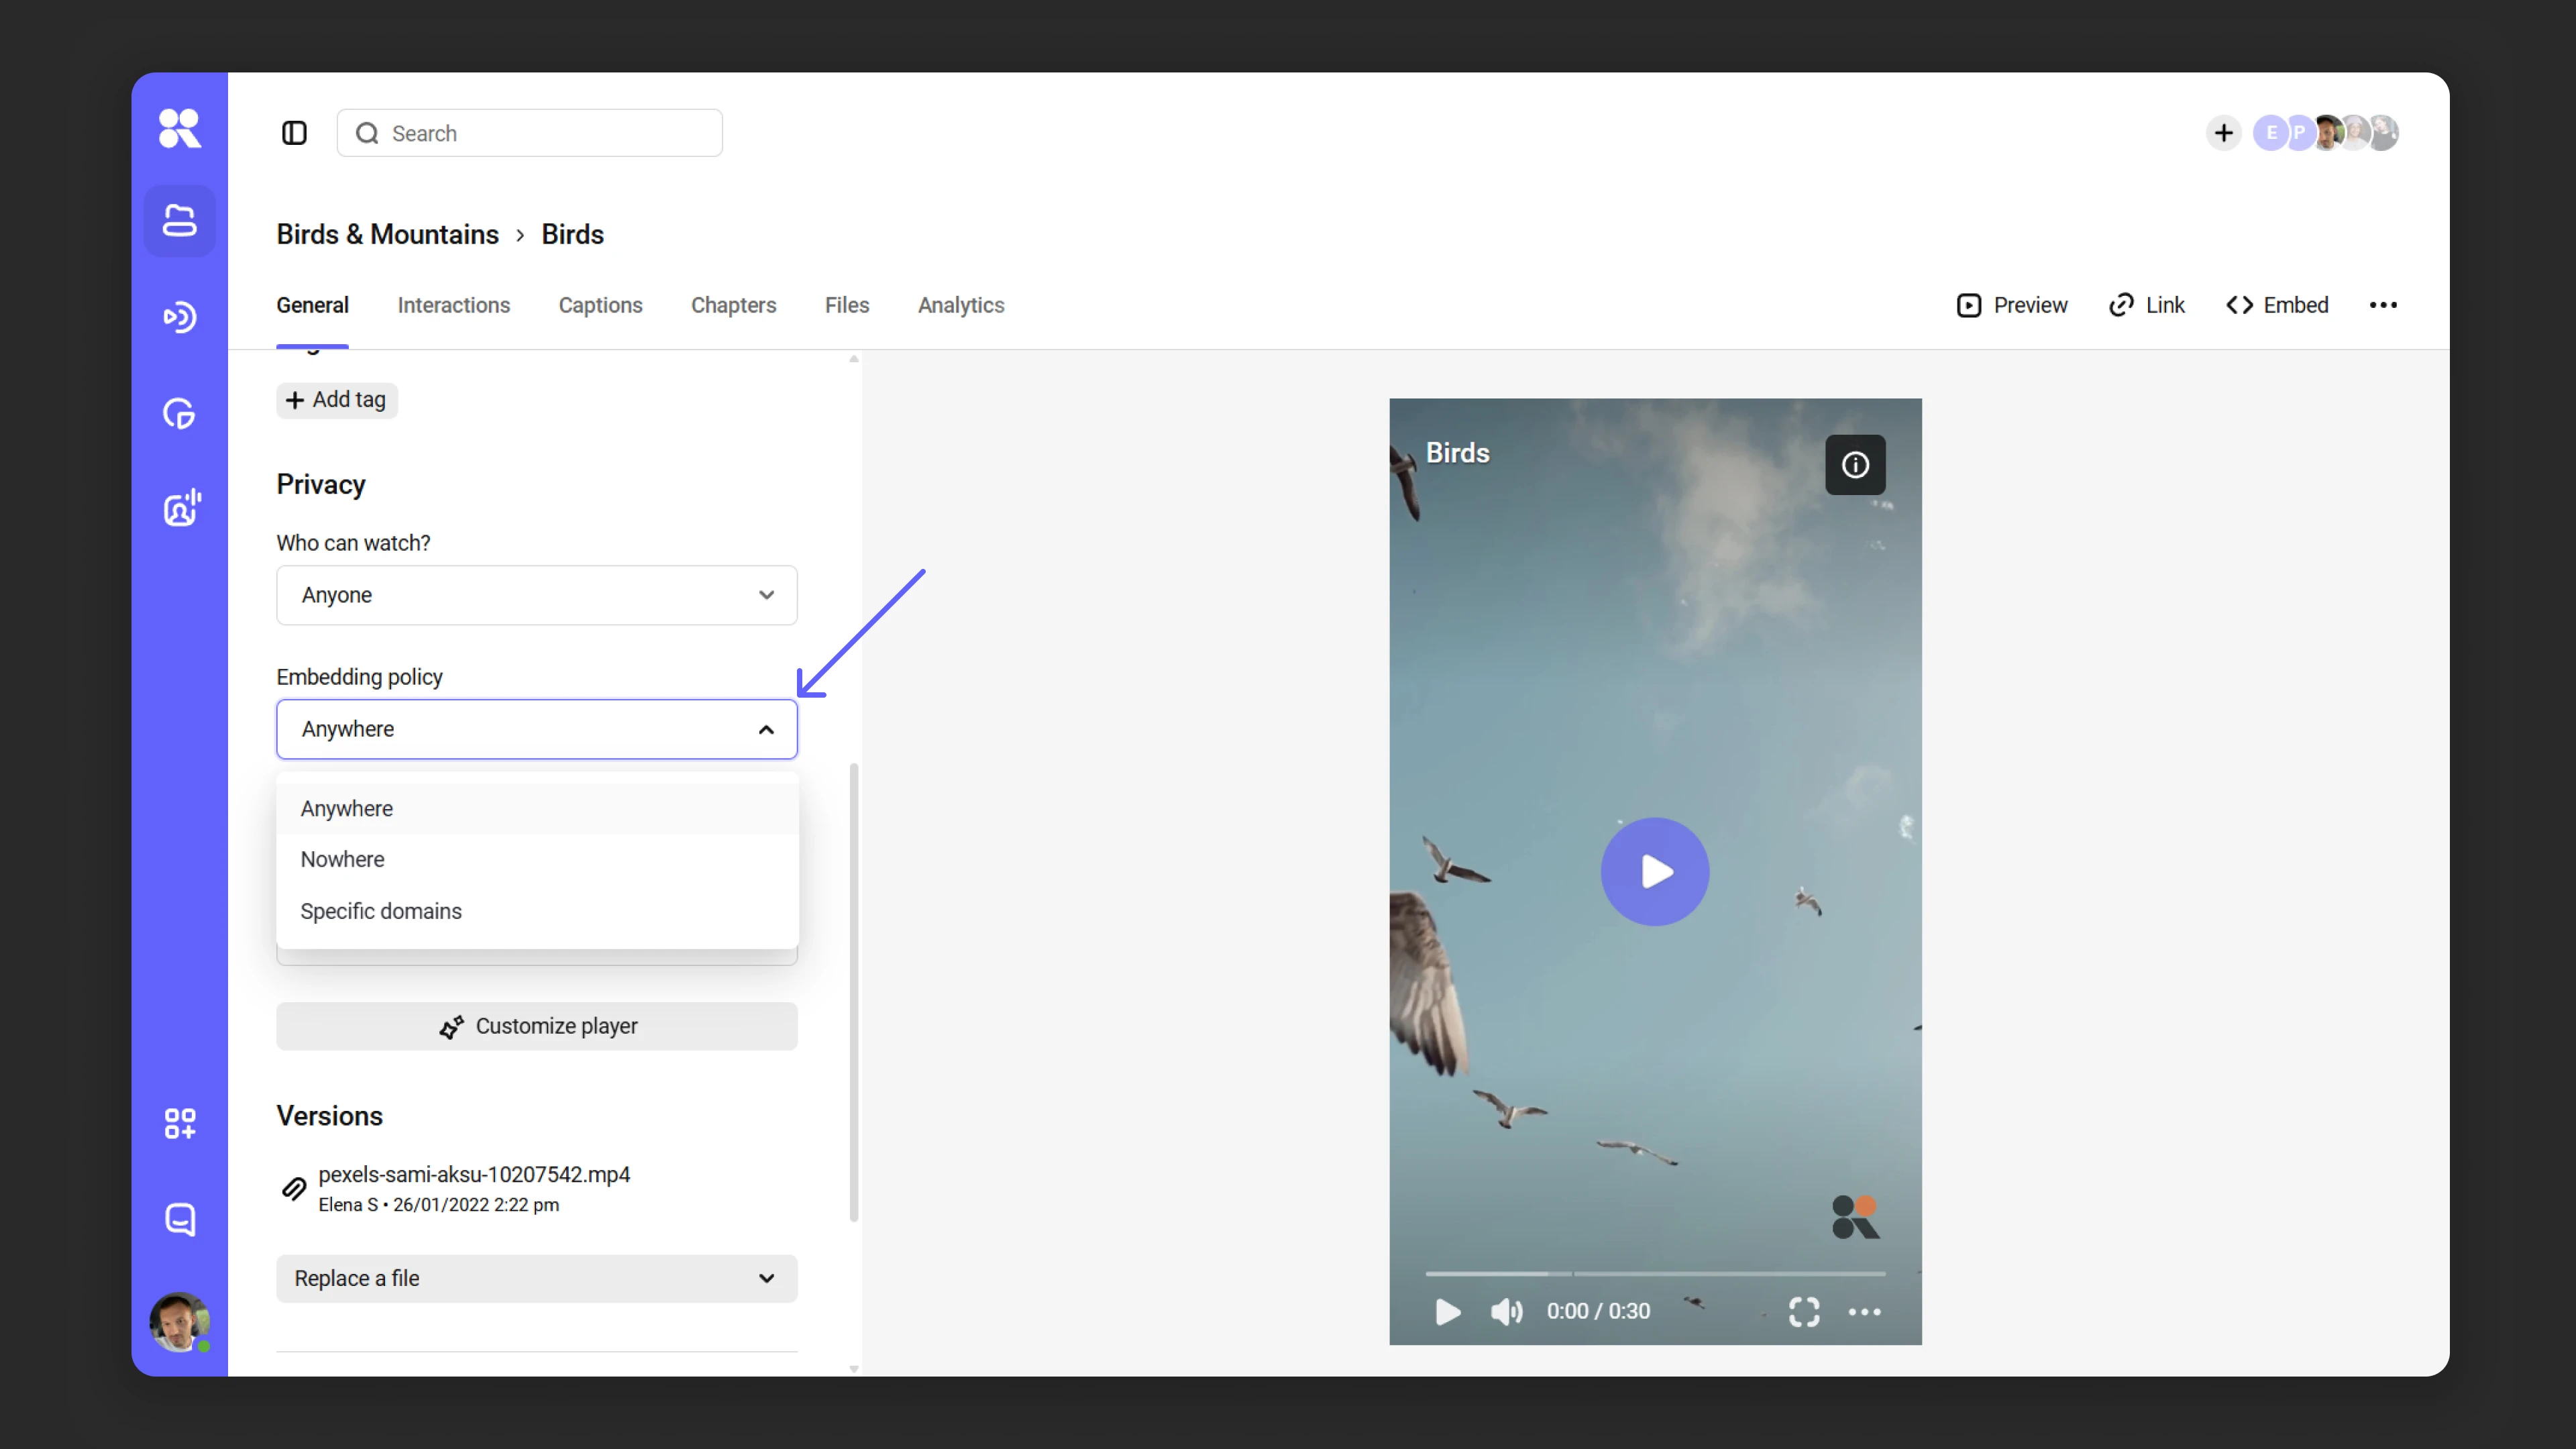
Configuring embedding
Kinescope lets you restrict media file embedding by domain, so you can place content only on trusted websites. This setting is available in the “Where can the player be shown?” section and offers three options:
- Everywhere — no restrictions.
- Nowhere — prevents embedding, but does not restrict access via private link, password, or unique code.
- On specified domains — restricts embedding to the specified domains only.
Adding domains
To allow media file embedding on specific domains:
- In the privacy settings, find “Where can the player be shown?” and select “On specified domains”. Then click “Add domain” — a data entry window will open.
- Enter trusted domains one by one in the text field. After each domain, press Enter or click “Create new domain” to add it to the list.
*.orangetrees.com and orangetrees.com.- If a domain already exists, the system will suggest it in a list. Click the relevant option to select it.
- When all domains have been selected, click “Add”, then “Save”.
Removing a domain
To remove a domain from the trusted list:
- Find the domain in the list.
- Click the “×” next to it.
Managing domains via the domain manager
Using the “Domain manager”, you can add, edit, and delete domains, as well as view their linked media files:
- Via the “Domains” dialog in specific file settings.
- Via the settings section in the dashboard.
Adding a new domain
- Click the “New domain” button.
- In the “Name” field, enter the domain name.
- Click “Add” to save changes.
Editing domains
- Click the “Edit domain” icon next to the desired domain.
- In the window that opens, make changes → click “Save”.
Archiving and deleting domains
If a domain is no longer in use, you can:
- Archive it to restore later;
- Delete it permanently if it’s no longer needed.
To do this, click the “Archive domain” or “Delete” icon next to the domain. In the dialog box, select the desired action. Archived domains can be restored in the “Archive” tab by clicking “Restore domain”.
Viewing media files linked to a domain
- Click the number next to the domain name in the “Media” column.
- A list of all media files linked to that domain will open.
Selecting or creating a player for a media file
In the “Player” section, you can select a ready-made player template for the video and modify the settings of the selected template. If you change the template settings, they will also apply to all videos using that template.
Getting familiar with player settings is straightforward — learn more in the section .

Replacing media files
If you need to update a file while keeping the link, embed code, analytics, tags, poster, privacy settings, and other data unchanged, use the “Versions” feature.
How to replace a file
- In the catalog or via search, find the video you need and double-click its name to open settings.
- On the “General” tab, scroll down to the “Versions” section. Click “Replace file”, then select “Upload” and specify the new version in the popup window.
- The upload and processing process will start automatically and can be tracked in the “Versions” section.
After upload completes, the old version is automatically deleted, and the “Versions” block shows information about the current file (name, date and time of replacement, name of the user who replaced it).
Sharing access to media files
Kinescope offers two ways to publish: direct links and embed codes.
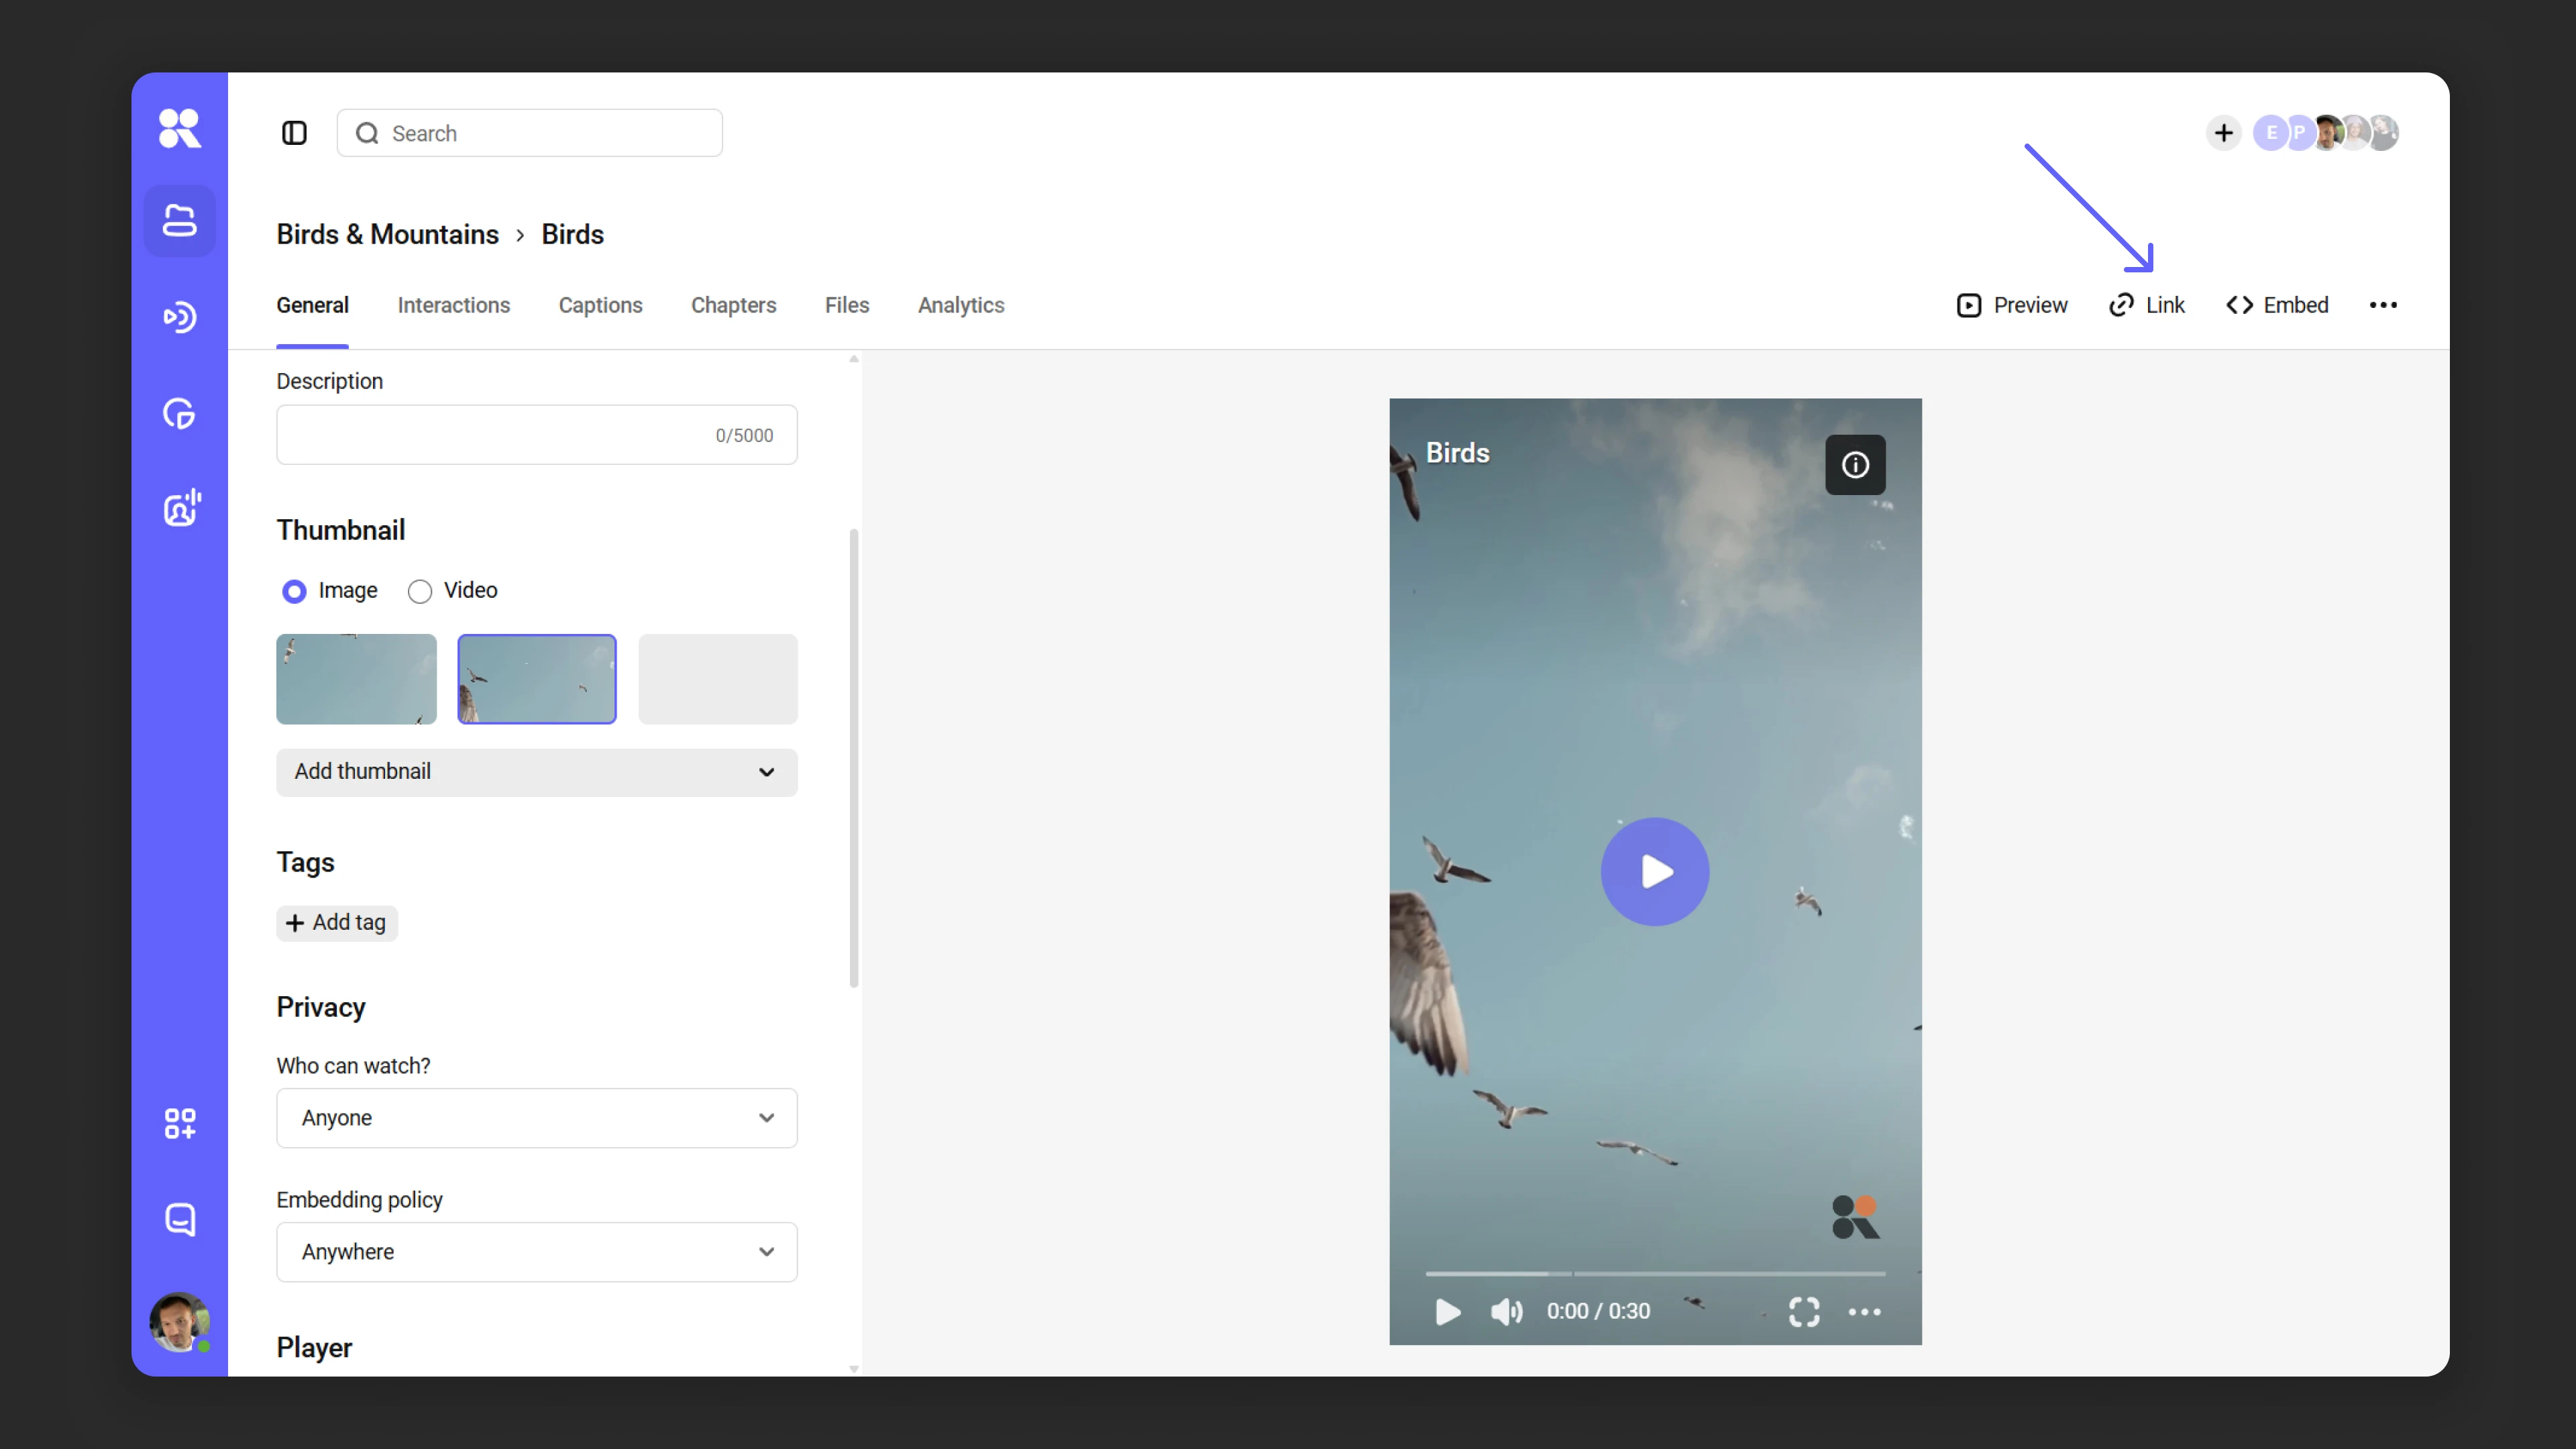
Sharing open access via link
- Click the “Link” button above the media player → “Copy”. You can also specify a start time so viewers jump directly to the desired segment.
- Alternatively, use the three-dot menu in the upper-right corner of the settings panel. Select “Copy link” → “Copy video link”.
When privacy settings are applied
- Users with a password: share the link along with the password set in the privacy settings (see Password access ).
- Users with unique codes: share the video link and the codes from your downloaded batch (see Access by unique codes ).
- Users with a private link: use the unique private link available in the privacy settings (see Private link ).
Publishing files using an embed code
To embed media on websites and platforms:
- Click the “Embed” button above the media player.
- Click “Copy code” in HTML format.
You can choose:
- Responsive embed code for automatically adapting player dimensions.
- Fixed embed code if you need strict player dimensions.
Use the additional parameters to configure size and aspect ratio. You can also use the three-dot menu in the upper-right corner of the settings panel and select “Copy link” → “Copy embed code” (by default, the fixed embed code is copied).
What’s next?
After configuring the basic media file parameters, we recommend:
- Organize your media library — create projects and folders to structure your content
- Embedding — adding video to your website
- Customize the player — adapt the player’s appearance to your brand
- Add subtitles and chapters — improve accessibility and navigation in video
- Set up content protection — restrict video access by domain, password, or authorization
Still have questions? Write to the support chat within the Kinescope interface — our specialists will help!