Built-in Video Editor
The Kinescope built-in video editor lets you make basic changes to video directly in the browser, without downloading or installing third-party software. The tool is suitable for quick trimming, removing unwanted segments, and adjusting audio before publishing or embedding.
Who this article is for
- Course creators — need to remove intros, pauses, or failed takes from lessons
- Marketers — need to quickly prepare a clip for publication: trim the ending, cut out unwanted parts
- Instructors — need to split a long recording into multiple parts for convenience
- Content owners — need to make edits quickly without exporting to a separate video editor
How to open the editor
- Open the video page in the catalog — go to the “General”, “Subtitles”, “Chapters”, or any other tab.
- To the right of the player, click the three-dot button (⋮) “More”.
- From the dropdown menu, select “Edit”.
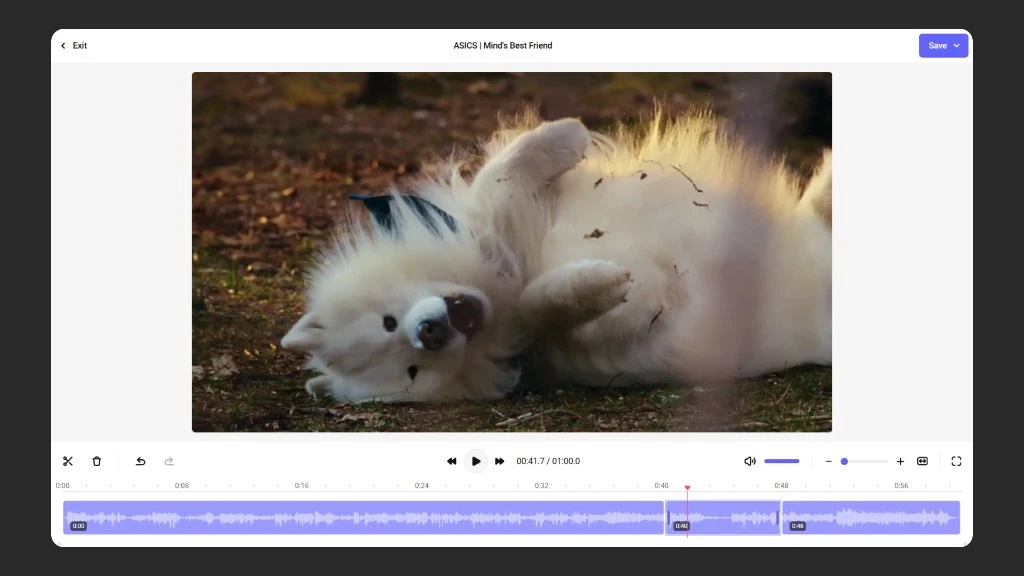
The video editor for the selected video opens. The interface includes a player for preview, a timeline with an audio track, and a toolbar — all elements are labeled.
Scenario 1: Trimming the beginning and end of a video
Use this when you need to remove an intro, a pause at the end of the recording, or dead time at the beginning.
- On the timeline, find the moment where the video should start. Place the slider there.
- Click the “Scissors” button — the video splits into segments.
- Select the left segment (the unwanted beginning) and delete it with the “Trash” button.
- Go to the end of the video. Place the slider at the point where you want to trim the ending.
- Click “Scissors” again, select the right segment, and delete it.
Preview the result in the player and repeat the steps if needed. Use “Undo” if you made a mistake.
Scenario 2: Cutting a segment from the middle of a video
Useful when you need to remove a slip, an awkward pause, or an unwanted take from a recording.
- Place the slider at the beginning of the segment you want to delete. Click “Scissors”.
- Place the slider at the end of that segment and click “Scissors” again.
- Select the resulting middle segment (the part to delete) and click “Trash”.
- The two remaining segments will automatically join together.
Check the join in the player — the transition should be smooth.
Scenario 3: Splitting a long video into multiple parts
When a lecture or webinar recording needs to be broken into separate lessons or episodes:
- Place the slider at the point where the first part ends. Click “Scissors”.
- Delete the right segment — it becomes the “cut off” material.
- Save the first part (see the section below about save types).
- Restore the right segment using the “Undo” button.
- Delete the left segment — the second part remains. Save it as a new file to avoid overwriting the original.
Repeat for each subsequent part.
Save types — what’s the difference
The “Save” menu offers two options:
- Save — applies edits to the current video. The original file is replaced by the edited version. Use this when edits are final and the original is not needed.
- Save as new file — creates a separate copy with the changes applied. The original remains unchanged. We recommend this option if you want to keep the original or are creating multiple versions of the same video.
What’s next?
After editing, we recommend:
- Configure access settings — set privacy and embedding settings
- Add subtitles and chapters — improve navigation and content accessibility
- Embed video on your site — place the player on the desired pages
Still have questions? Write to the support chat within the Kinescope interface — we’ll help.